Phê duyệt công việc và làm thêm giờ
Ứng dụng Attendances của Odoo cần có sự giám sát của quản lý để đảm bảo mọi giờ làm đã ghi nhận là chính xác, đặc biệt là giờ làm thêm và ca làm không đầy đủ.
Bảng điều khiển quản lý
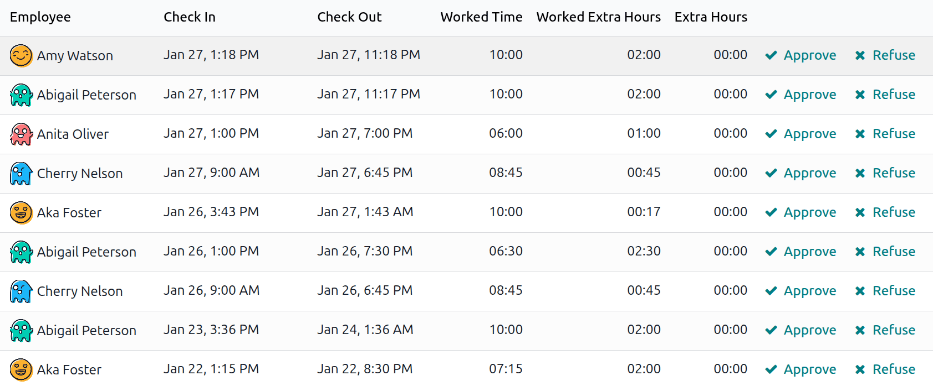
Tất cả các bản ghi chấm công cần phê duyệt, thường do các mục công việc trùng lặp hoặc thời gian nghỉ chưa được phê duyệt, được quản lý từ một bảng điều khiển quản lý tập trung. Để truy cập, chuyển đến .
Bảng điều khiển Management chỉ hiển thị các bản ghi chấm công cho nhân viên hiện tại cần được phê duyệt, trong chế độ xem danh sách mặc định. Điều này là do hai bộ lọc mặc định trong thanh tìm kiếm, To Approve và Active Employees.
Mỗi bản ghi chấm công hiển thị các thông tin sau:
Nhân viên: Tên của nhân viên.
Check In: Ngày và giờ mà nhân viên đã vào ca.
Check Out: The date and time the employee checked out.
Worked Time: The number of worked hours the employee logged.
Worked Extra Hours: The amount of overtime worked.
Extra Hours: The total approved extra hours.
Phê duyệt và từ chối
Các bản ghi chấm công có thể được phê duyệt và từ chối trực tiếp từ Bảng điều khiển Quản lý. Ở phía bên phải xa nhất của mỗi bản ghi, các nút Phê duyệt và Từ chối xuất hiện. Nhấn nút tương ứng để phê duyệt hoặc từ chối bản ghi chấm công đã ghi lại.
Ghi chú
Khi phê duyệt hoặc từ chối các bản ghi chấm công từ bảng điều khiển Management, không thể xem chi tiết của bản ghi chấm công.
Phê duyệt một phần
Có thể phê duyệt một phần của Extra Hours đã ghi nhận và không phê duyệt toàn bộ số giờ. Để chỉ phê duyệt một phần giờ làm thêm, nhấp vào bản ghi chấm công để xem chi tiết.
The top half of the record displays the specific check in and check out details, including the method used. The Check In and Check Out information in the top half of the form can be modified, if needed. Click into the desired field, and make any needed changes.
The bottom half of the form contains the Overtime Details tab. This tab lists the overtime rules used to calculate the extra hours, along with the pay rate and status. The extra hours listed in this tab can be modified, allowing for partial overtime approval.
Click into the Extra Hours (encoded) field of the line being modified. Enter the amount
of hours being approved in an HH:MM format, then click Approve at the
end of the line.
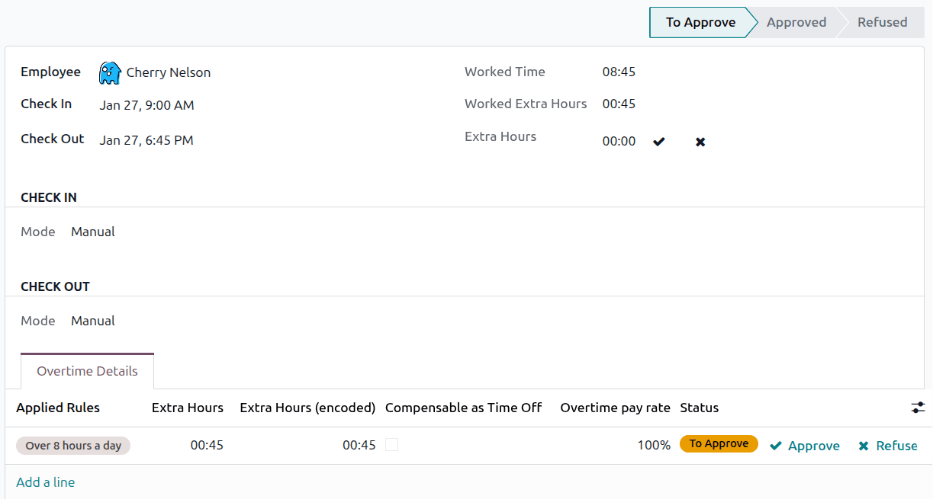
After editing and approving the Extra Hours (encoded) field, the status changes to Approved, and the Extra Hours field in the top half of the form updates to display the approved overtime.
Quan trọng
Once partial overtime is approved, it is still possible to deny overtime by clicking the icon next to the Extra Hours field in the top half of the form, or clicking Refuse at the end of the overtime entry in the Overtime Details tab.
Ghi chú
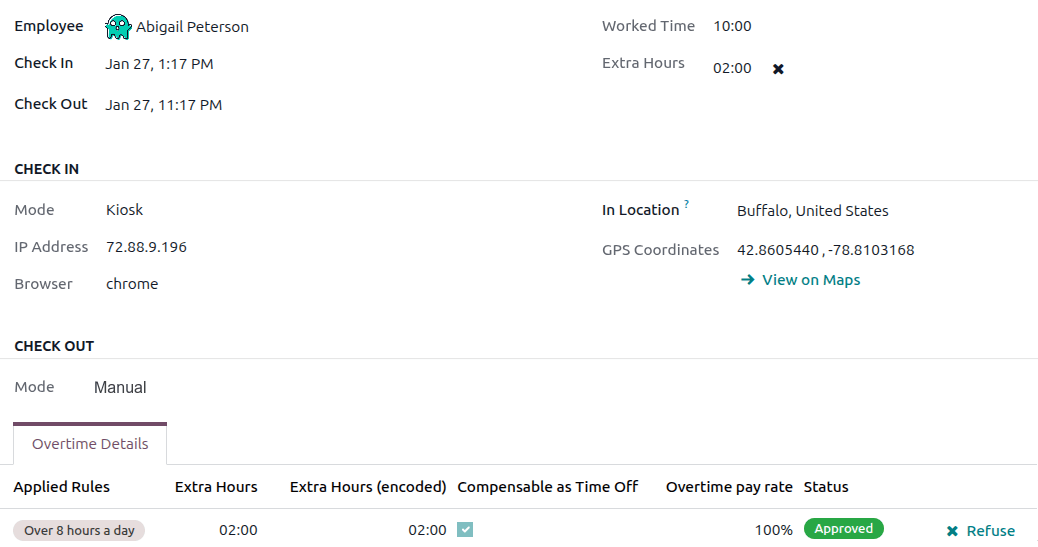
Thỉnh thoảng, việc kiểm tra vị trí của nhân viên khi chấm công có thể cần thiết. Phương pháp mà nhân viên đã chấm công để vào làm được tìm thấy trong bản ghi cá nhân, tại trường Mode.
The Mode field is not modifiable, as it only logs the method the attendance record was created.
Các tùy chọn khả dụng là:
Kiosk: The employee physically checked in or out using a kiosk device. The employee was present at the kiosk to check-in.
Systray: The employee checked in or out directly from the database. Depending on the IP Address displayed on the detailed attendance record, the employee's location at the time of check-in can be determined.
Manual: The record was created manually in the Attendances app. This is typically done by management, to add a missing record.
Convert overtime to time off
Some companies allow for the conversion of overtime into time off. To convert all or a portion of overtime into time off, navigate to . Click on the desired attendance record to view the specific attendance details.
In the Overtime Details tab, adjust the amount of overtime being converted to time off in the Extra Hours (encoded) field, if necessary. Next, click the checkbox in the Compensable as Time Off column, indicating the overtime should be converted to time off. Click Approve at the end of the line, and the status changes to Approved, and the Extra Hours field in the top half of the form updates to reflect the approved overtime.
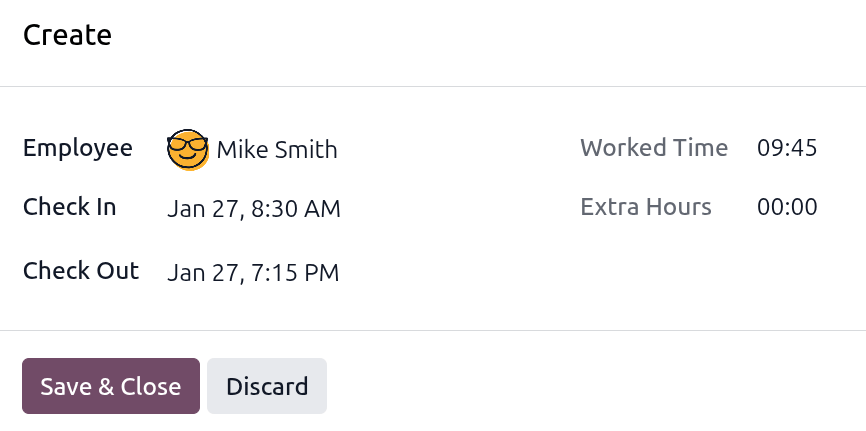
Tạo bản ghi chấm công
Khi cần thiết, người dùng có access rights có thể tạo bản ghi chấm công thủ công trong ứng dụng Attendances. Một số tình huống yêu cầu việc này là khi nhân viên quên check‑in và check‑out cho các ca, vì nhân viên không thể tạo bản ghi chấm công một cách hồi tố.
To add a missing attendance record, navigate to . Click the New button in the upper-left corner to open a Create pop-up window. Enter the following information on the form, then click Save & Close:
Employee: Select the employee the record is being created for. The signed-in user populates this field, by default.
Check In: Using the calendar, select the check in date and time, then click Apply. By default, the current date is selected, and the time is set to
12:00:AM.Check Out: Using the calendar, select the check out date and time, then click Apply. By default, the following date is selected, and the time is set to
12:00:AM.Worked Time: This field is automatically populated with the difference from the selected Check In and Check Out times. This field cannot be modified.
Extra Hours: This field is not modifiable as overtime must be approved. This field displays zero (
00:00) by default.